一、前言

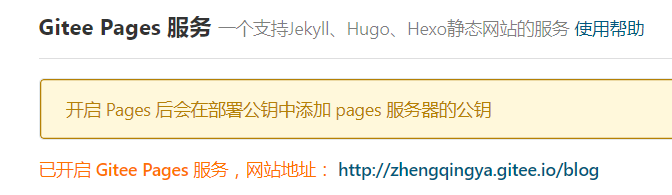 如上图所示:GitHub有Github Pages,而码云也有码云 Pages
 1、Github Pages或Gitee Pages是什么呢?
Github Pages或者Gitee Pages是一个免费的静态网页托管服务,我们可以使用它来托管博客、项目官网等静态网页。
之前小编也有写过关于,其采用Jekyll模板搭建~
目前码云 Pages 支持 Jekyll、Hugo、Hexo编译静态资源。2、Jekyll、Hugo、Hexo 是什么?
温馨小提示:码云上是如下介绍这三者
Jekyll、Hugo、Hexo 是简单的博客形态的静态站点生产机器。它有一个模版目录,其中包含原始文本格式的文档,通过 Markdown 以及 Liquid 转化成一个完整的可发布的静态网站,你可以发布在任何你喜爱的服务器上。Jekyll、Hugo、Hexo 也可以运行在 码云(Gitee.com) Pages 上,也就是说,你可以使用码云的服务来搭建你的仓库页面、博客或者网站,而且是完全免费的。
Jekyll 使用文档:
Hugo 使用文档:
Hexo 使用文档:
下面小编将介绍使用其中的Hexo来搭建个人博客的全过程~
3、为什么采用Hexo呢?
原因是Hexo基于NodeJS实现,而目前主流的vue前端一般都是使用npm或者yarn来跑项目,因此使用hexo搭建个人博客,易学,且搭建环境相对简单~
而 上这样介绍它:
Hexo是一个快速,简单和强大的博客框架。您使用Markdown(或其他语言)撰写帖子,Hexo会在几秒钟内生成具有漂亮主题的静态文件。
二、安装基本环境
1、Git :
2、Node.js :
三、安装Hexo
npm install -g hexo-cli
四、初始化项目 -> 配置 -> 部署到码云访问 -> 本地运行
1、初始化项目
在项目预存位置,cmd或者git bash执行如下命令:
hexo init blog # 注:blog为执行完此命令后项目所在文件夹名


2、修改站点配置文件 _config.yml
可参考Hexo官网提供文档进行修改:
注:deploy部署需要安装 hexo-deployer-gitnpm install hexo-deployer-git --save
我的修改如下:
# Hexo Configuration## Docs: https://hexo.io/docs/configuration.html## Source: https://github.com/hexojs/hexo/# Sitetitle: 郑清的个人博客subtitle: zhengqing's blogdescription: Hello,here is zhengqing's blog.keywords:author: 郑清language:timezone:# URL## If your site is put in a subdirectory, set url as 'http://yoursite.com/child' and root as '/child/'url: http://zhengqingya.gitee.io/blogroot: /blog/permalink: :year/:month/:day/:title/permalink_defaults:# Directorysource_dir: sourcepublic_dir: publictag_dir: tagsarchive_dir: archivescategory_dir: categoriescode_dir: downloads/codei18n_dir: :langskip_render:# Writingnew_post_name: :title.md # File name of new postsdefault_layout: posttitlecase: false # Transform title into titlecaseexternal_link: true # Open external links in new tabfilename_case: 0render_drafts: falsepost_asset_folder: falserelative_link: falsefuture: truehighlight: enable: true line_number: true auto_detect: false tab_replace: # Home page setting# path: Root path for your blogs index page. (default = '')# per_page: Posts displayed per page. (0 = disable pagination)# order_by: Posts order. (Order by date descending by default)index_generator: path: '' per_page: 10 order_by: -date # Category & Tagdefault_category: uncategorizedcategory_map:tag_map:# Date / Time format## Hexo uses Moment.js to parse and display date## You can customize the date format as defined in## http://momentjs.com/docs/#/displaying/format/date_format: YYYY-MM-DDtime_format: HH:mm:ss# Pagination## Set per_page to 0 to disable paginationper_page: 10pagination_dir: page# Extensions## Plugins: https://hexo.io/plugins/## Themes: https://hexo.io/themes/theme: landscape# Deployment## Docs: https://hexo.io/docs/deployment.htmldeploy: type: git # repo: https://github.com/zhengqingya/zhengqingya.github.io # github仓库 repo: https://gitee.com/zhengqingya/blog # 码云仓库 branch: master message: # 自定义提交消息
3、部署项目到码云访问
执行如下命令生成静态文件(public文件夹),并提交到码云或github远程仓库上
hexo d


 部署成功后,访问测试
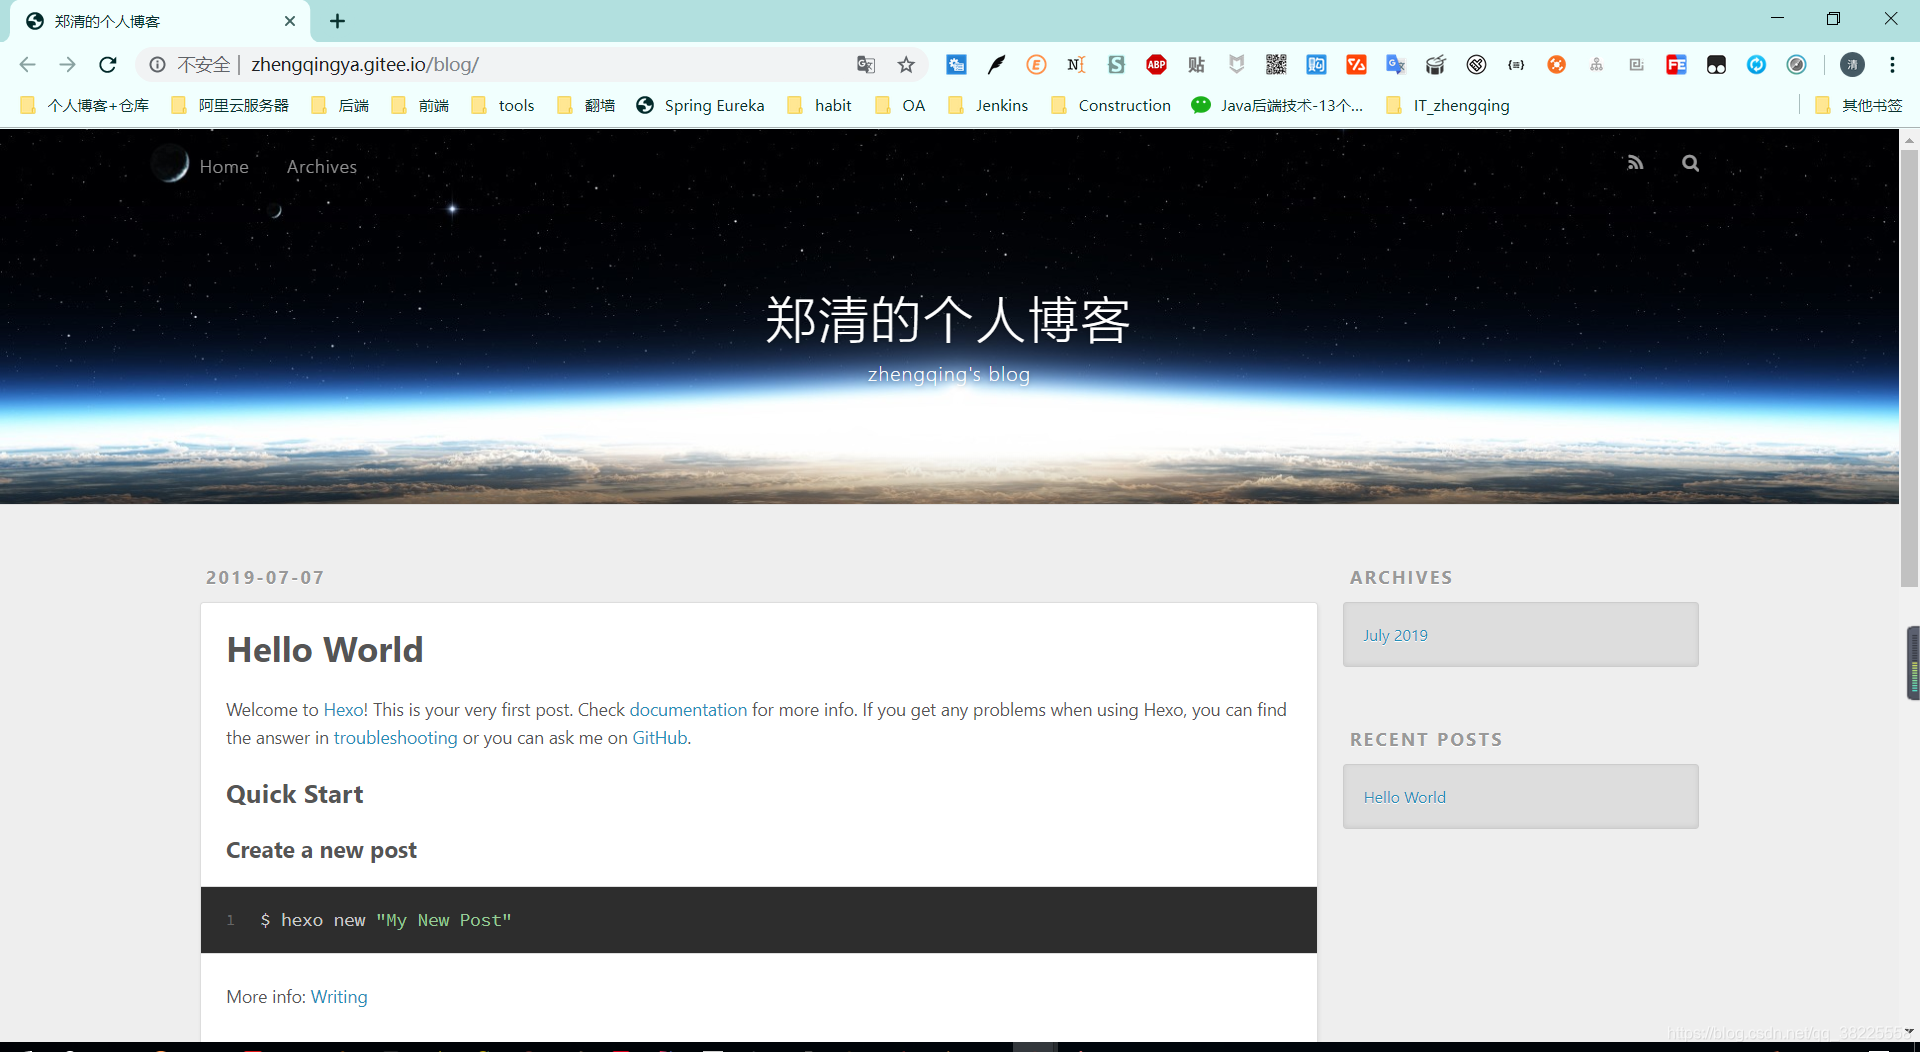
4、本地运行
执行命令:
hexo s -g


温馨小提示:如果修改过文件内容,需要通过如下命令清除已经生成的静态文件,重新生成哦!
hexo clean
五、修改主题
觉得Hexo默认主题不好看的,我们也可以去官网找个自己喜欢的主题来修改使用:
1、安装新主题,比如这里我选择的是
git clone https://github.com/litten/hexo-theme-yilia.git themes/yilia
下载的新主题会放在themes目录下

2、修改配置
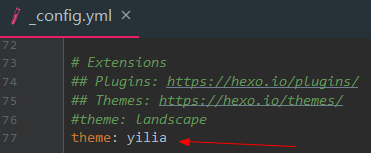
①修改项目根目录下的 **_config.yml,将theme指定的landscape修改为yilia**
 ②项目根目录下执行命令
 npm i hexo-generator-json-content --save
③在项目根目录下的 **_config.yml** 中新增如下内容:
# yilia主题所需新增内容jsonContent: meta: false pages: false posts: title: true date: true path: true text: false raw: false content: false slug: false updated: false comments: false link: false permalink: false excerpt: false categories: false tags: true
④最后重新生成静态文件运行
hexo cleanhexo s -g

hexo d
注:这里需要我们去码云仓库上手动更新服务重新部署才能修改上次主题哦!

六、写博客
方式一:执行如下命令
hexo new demo #demo为博客文件名
会生成到 **_posts** 目录下

方式二:直接在 _posts 目录下手动创建markdown文件编写
七、总结
- 使用Hexo搭建个人博客可以多参考官方文档
- 本地运行时,修改完文件后(除了配置文件一类),可以直接ctrl+s保存,然后刷新页面即可查看效果,很方便
- 注意将我们的代码备份保存哦 ! 小编这里是将博客代码备份到github上面保存,将生成的静态文件部署到码云上访问 ~
- 关于其它功能,比如自定义域名访问,可直接参考hexo官方文档,都是非常简单的操作哦 ~